How To Get Unlimited Email with Custom Domain – Part 1
Introduction
Did you know you can get unlimited email addresses with a custom domain, even if your domain provider doesn’t offer email services? In this guide, I’ll show you how to do it with a .tech domain that provides only two emails through the GitHub Student Developer Pack.
We’ll use Cloudflare Email Routing and Google to achieve this. In Part 1, we’ll set up receiving emails. Sending emails from your custom email address will be covered in Part 2.
Setting Up Cloudflare for Your Domain
To use Cloudflare’s Email Routing service, you’ll need to add your domain to Cloudflare’s DNS. Here’s how:
-
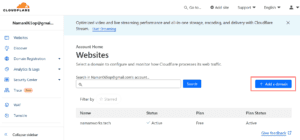
Go to Cloudflare Dashboard:
- Click on “Add Site” or “Add Domain.”

- Click on “Add Site” or “Add Domain.”
-
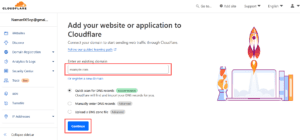
Enter Your Domain Name:
- Type in your domain and click Continue.

- Type in your domain and click Continue.
-
Select the Free Plan:
- Choose the Free Plan and click Confirm.
-
Update NameServers:
- Cloudflare will provide NameServers (NS) that you need to add to your domain provider’s console.
- Important: Remove any other NameServers from your domain settings to allow Cloudflare full access.

After completing these steps, your domain will be added to Cloudflare. Cloudflare will send a confirmation email once your domain is verified. This process usually takes between 15 minutes and 2 hours, though it can sometimes take up to 24 hours. If your domain isn’t added, recheck the NameServers you entered.
Setting Up Email Routing with Cloudflare
Now, let’s move to the main part—configuring email routing to your custom domain.
-
Navigate to Email Routing:
- In your Cloudflare dashboard, select your domain.
- Go to Email Routing under the “Email” section in the sidebar.
-
Click “Get Started”:
- Follow the on-screen instructions to set up routing.
-
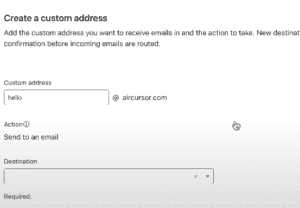
Add Custom Domain:
- Specify the custom domain you want to use (e.g.,
hello@yourdomain.tech). - Select the destination email where emails should be forwarded (e.g., your Gmail account).

- Specify the custom domain you want to use (e.g.,
-
Verify Your Destination Email:
- Cloudflare will send a verification email to your destination address. Verify by following the instructions in the email.
-
Add DNS Records:
- Cloudflare will provide MX and TXT DNS records. Add these to your domain’s DNS settings on Cloudflare by Clicking on “Add Record and Enable”
And that’s it! Now you can receive emails sent to your custom domain address, which Cloudflare will route to your specified destination email. To the sender, it will look like they’re emailing your custom address directly!
Adding Multiple Custom Email Routing Rules
Want more custom addresses? Cloudflare makes it easy to add multiple routing rules. Here’s how:
-
Go to Email Routing:
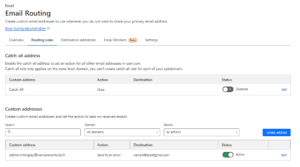
- Under your domain in Cloudflare, navigate to Email Routing and then Routing Rules.
-
Create a New Address:
- Click Create Address to set up a new custom email address.
- Enter the custom email address (e.g.,
support@yourdomain.tech) and the destination email (e.g., another Gmail address or the same one used earlier).
-
Repeat as Needed:
- You can add as many custom addresses as you want, such as
info@yourdomain.tech,sales@yourdomain.tech, or any other format you need. - This is especially useful for setting up dedicated email addresses for different purposes, like support, inquiries, or sales, all routed to the same or different destination addresses.
- You can add as many custom addresses as you want, such as
How It Works
By adding the necessary MX records, emails sent to addresses like hello@yourdomain.tech are received by Cloudflare servers. Cloudflare then checks the email routing rules you set up:
- If the address is valid and exists in your routing rules, Cloudflare forwards the email to your specified destination address (e.g., Gmail).
- If the address isn’t in your routing rules, the email will not be forwarded.
In my case, I’ve set up routing for my domain namanworks.tech so that emails sent to hello@namanworks.tech are forwarded to my Gmail account naman065op@gmail.com.
Stay tuned for Part 2, where we’ll cover sending emails from your custom domain


Responses